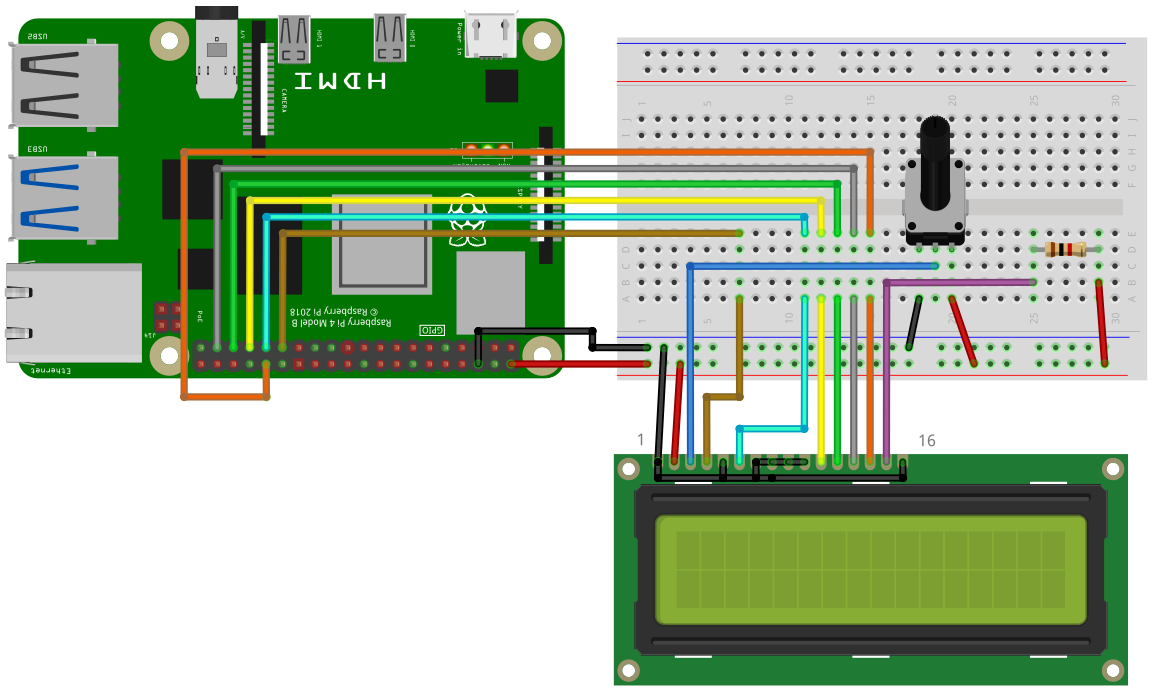
HD44780 Text Display Example
Wiring
For running this example, you need a HD44780 compatible text display. Quite common are displays with 1, 2 or 4 lines, with 16 or 20 characters in each line. To adjust the contrast of the display a potentiometer with 10kOhms will be used. If you have a display with a background LED illumination, then a LED resistor might be neccessary. If you don’t aim for maximum brightness of the LED, then take a 220 Ohms or even a 1kOhm resistor. The display will be used in 4bit mode, therefore the data pins DB0 to DB3 are not used.

Connect the pins of the display to the following pins of the Raspberry Pi
| LCD pin | LCD pin name | RPi Pin Name |
|---|---|---|
| Pin 1 | VSS | GND |
| Pin 2 | VDD | 5V |
| Pin 4 | RS | GPIO5 |
| Pin 5 | R/W | GND |
| Pin 6 | E | GPIO6 |
| Pin 7 | DB0 | GND |
| Pin 8 | DB1 | GND |
| Pin 9 | DB2 | GND |
| Pin 10 | DB3 | GND |
| Pin 11 | DB4 | GPIO13 |
| Pin 12 | DB5 | GPIO19 |
| Pin 13 | DB6 | GPIO26 |
| Pin 14 | DB7 | GPIO12 |
Pin 3 (V0) -> Connect to the potentiometer
If you have a background LED:
Pin 15 (LED+) -> Connect to the LED resistor
Pin 16 (LED-) -> GND
Software
import SmallBasicPIGPIO as gpio

' The display is connected to the following pins
const PIN_RS = 5
const PIN_E = 6
const PIN_D4 = 13
const PIN_D5 = 19
const PIN_D6 = 26
const PIN_D7 = 12

'Init the display
gpio.LCD1_Init(PIN_RS, PIN_E, PIN_D4, PIN_D5, PIN_D6, PIN_D7)

'Clear LCD and move cursor to position (1,1)
gpio.LCD1_Cls()
gpio.LCD1_Print("Test1")

'Move cursor to position (5,2)
gpio.LCD1_Locate(5,2)
gpio.LCD1_Print("Test2")

'Turn LCD off and on
delay(1000)
gpio.LCD1_Off()
delay(1000)
gpio.LCD1_On()